Published 2026-11-09 · Updated 2026-11-10
Scan Your Own VPS From Outside: Open Ports With nmap
Short answer: run nmap from a second machine (another small VPS or your home connection) against your own server's IP address. Use nmap -Pn -p- --open YOUR_IP to list every open TCP port. Save the result as an XML baseline, repeat it from cron, compare runs with ndiff and send a Telegram message only when the open ports change. Scanning from the server itself shows the wrong picture.
Only scan what you own. This guide is about your own servers, with your hosting provider's rules in mind. A port scan sends connection attempts to many ports and records which ones answer, and it is one check in the wider self-hosted security monitoring series. It maps your attack surface, the things reachable without logging in. For web exposure, see the sibling guide on scheduled Nuclei scans with Telegram alerts.
In this article
Why scan from the outside, not from the server Ground rules: only your own IPs, from a second machine The nmap commands you need and how to read them Save a baseline and compare runs with ndiff A cron script that alerts in Telegram only on change We ran it in Docker: real output Compare with the server view: ss and ufw What should be open, and what to do when it is not Politeness, limits and what to do next Frequently asked questionsQuick win (25 minutes)
- On the server run
sudo ss -tulnpand write down every port that listens on0.0.0.0or[::]. - From a second machine run
sudo nmap -Pn -p- --open YOUR_SERVER_IP(replace the placeholder with the IP of your own server). - Compare the two lists. For a typical web VPS only 22, 80 and 443 should answer from outside. See the table of expected ports.
- Save the scan as a baseline with
-oX baseline.xmlso a later run can be compared against it. - Install the cron script so a new open port reaches Telegram within a day.
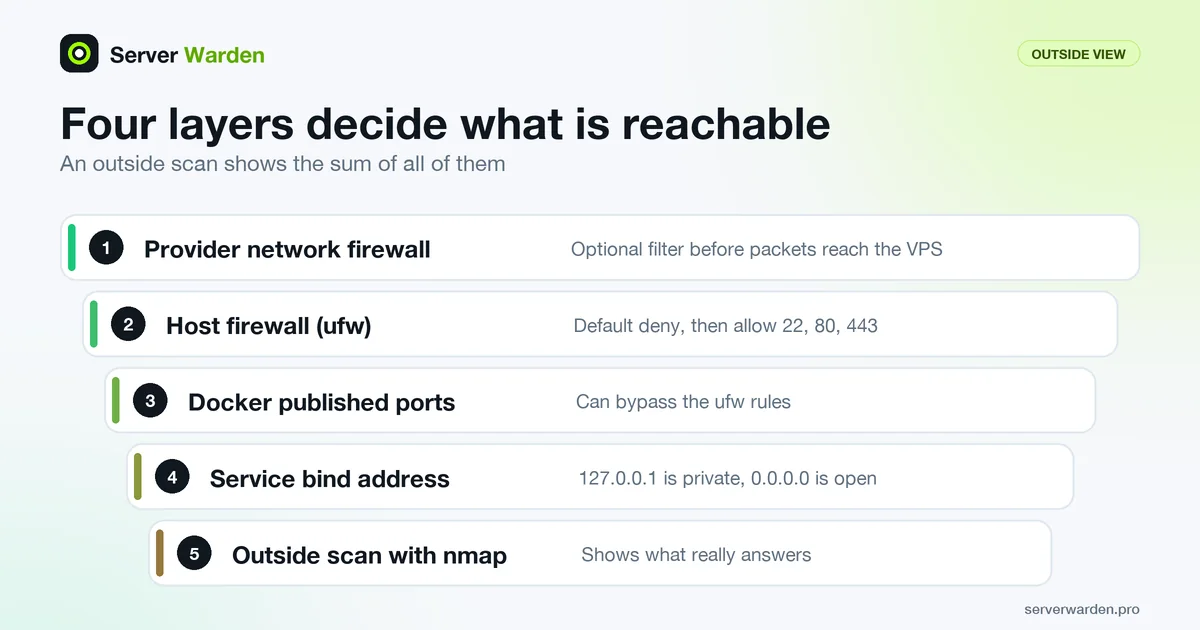
Why scan from the outside, not from the server
Four layers decide whether a port answers the internet: an optional network firewall at your hosting provider, the host firewall (ufw; see the Linux firewall guide), Docker's own rules, and the address each program listens on (127.0.0.1 is private, 0.0.0.0 means every interface). These layers can disagree. Docker is the usual surprise: the Docker documentation says published container ports are diverted before they reach ufw's rules, so a clean ufw status can still sit next to an open container port. See the Docker host security guide and exposed databases.
A scan from outside tests the sum of all four layers, which is what any visitor on the internet gets. A scan from the server itself does not. In our Docker test a service on port 8080 was blocked by ufw: nmap run on the server reported it open, nmap run from a second container reported it filtered. Real output is in the Docker section.
Ground rules: only your own IPs, from a second machine
Follow these rules before the first scan:
- Only scan IP addresses you own or have written permission to test. The legal issues chapter of the Nmap book says the best approach is to get permission first. This is not legal advice, and laws differ by country.
- Read your hosting provider's acceptable use policy. The same chapter notes that scanning without authorization is sometimes against a provider's policy. Check the provider of the scanner and the provider of the target.
- Scan from a second machine: another small VPS, ideally at a different provider, or your home connection. It sees the same path a visitor sees.
- Scan the server IP, not the domain name. A name behind Cloudflare leads to Cloudflare's network, which is not yours. Cloudflare's port documentation says it proxies only a fixed list of HTTP and HTTPS ports.
- Scan IPv4 and IPv6 separately. A public IPv6 address has its own firewall rules (ufw lists them as v6). This guide shows IPv4.
The nmap commands you need and how to read them
Install nmap and ndiff on the scanner (ndiff is a separate package on Debian and Ubuntu; we used nmap 7.94 on Ubuntu 24.04). Run scans with sudo: per the Nmap reference guide, the default SYN scan needs permission to send raw packets (root on Unix) and falls back to a slower connect scan without it. Addresses below are documentation addresses; use your own server's IP.
sudo apt install nmap ndiff curl

# quick: the 1000 most common TCP ports (the default list)
sudo nmap -Pn --open 203.0.113.10
# full: every TCP port, 1 to 65535
sudo nmap -Pn -p- --open 203.0.113.10
# full, saved as XML for later comparison
sudo nmap -Pn -p- --open -oX scan.xml 203.0.113.10- Ports. The default is the 1,000 most popular ports of each protocol;
-Fscans the 100 most common,--top-ports Na number you choose, and-p-the whole range. Odd ports such as 8080 are why the full scan matters. --openprints only open ports. The output chapter says it implies--defeat-rst-ratelimit(since Nmap 7.40), hence the note "Some closed ports may be reported as filtered" in our output.-Pnskips host discovery. Otherwise, as root, nmap first sends an ICMP echo, a TCP SYN to port 443, a TCP ACK to port 80 and an ICMP timestamp request, so a host that filters all of them can look down.- Timing. The timing documentation lists
-T0to-T5, with-T3as the default. Polite (-T2) uses less bandwidth and target resources and can take about ten times longer; aggressive (-T4) assumes a fast, reliable network, and the author calls-T5too aggressive. On a small VPS keep the default or go polite. - Output.
-oXwrites XML, which the manual calls the preferred format for programs. Grepable output (-oG) is marked deprecated. - UDP (
-sU) is slower and less certain. The UDP scan chapter says open UDP ports rarely answer, so silent ports are reported asopen|filtered, and many hosts rate limit the ICMP errors that mark closed ports, so a full UDP scan can take more than 18 hours. Scan only the ports you care about, for examplesudo nmap -sU -Pn -p 53,123,161 203.0.113.10. In our test all three came backopen|filteredalthough nothing listened.
Reading the states. The port states chapter defines six. open: an application accepts connections. closed: the port is reachable but nothing listens. filtered: packet filtering stops nmap from telling. In our lab, before ufw was on, 998 ports showed as closed (reset); with a default-deny policy (what it means) they showed as filtered (no-response). Both are fine: what matters is that nothing unexpected is open.
Save a baseline and compare runs with ndiff
A baseline tells you what changed. The Ndiff tool takes two Nmap XML files and prints the differences, and its site suggests scheduling scans and comparing them. Per the Ndiff manual, text output looks like a unified diff (a minus for a line only in the first scan, a plus for a line only in the second), and the exit status is 0 when the scans match, 1 when they differ and 2 on a runtime error.
sudo nmap -Pn -p- --open -oX baseline.xml 203.0.113.10
# later, or from cron:
sudo nmap -Pn -p- --open -oX new.xml 203.0.113.10
ndiff baseline.xml new.xml
echo $?
Alert on the exit code, not on the text. The header lines with version and time differ on every run, yet in our test ndiff returned 0 for two scans of the same ports. When you open a port on purpose, replace the baseline so the alert does not repeat.
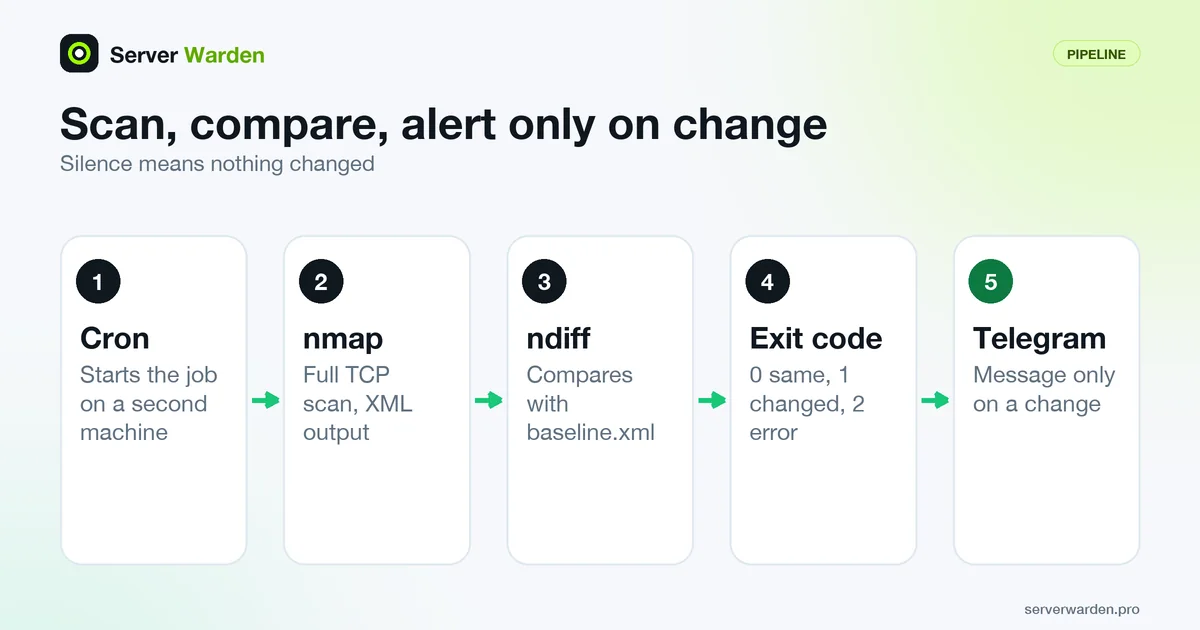
A cron script that alerts in Telegram only on change
Create a Telegram bot with BotFather: the Telegram docs say to use the /newbot command, which gives you a token that authorizes the bot, and that anyone holding it controls the bot. Send your bot a message, then open its getUpdates method (https://api.telegram.org/botYOUR_TOKEN/getUpdates) and read the chat id of the message. We did not test this part against Telegram.

On the scanner machine, keep the secrets in a root-only environment file (see environment variables) and the script in /usr/local/bin:
sudo apt install nmap ndiff curl
sudo install -d -m 700 /etc/portwatch
sudo install -m 600 /dev/null /etc/portwatch/portwatch.env
sudo nano /etc/portwatch/portwatch.env
TARGET=203.0.113.10
TELEGRAM_BOT_TOKEN=123456789:EXAMPLE_NOT_A_REAL_TOKEN
TELEGRAM_CHAT_ID=-1001234567890Then save the script as portwatch.sh, install it and add a root cron entry (sudo crontab -e) that runs it daily at 03:17:
#!/usr/bin/env bash
# portwatch.sh: scan YOUR OWN server from outside, alert on changes.
set -euo pipefail
umask 077

ENV_FILE=/etc/portwatch/portwatch.env
STATE_DIR=/var/lib/portwatch
API=${TELEGRAM_API:-https://api.telegram.org}   # for tests only

source "$ENV_FILE"   # TARGET, TELEGRAM_BOT_TOKEN, TELEGRAM_CHAT_ID
mkdir -p "$STATE_DIR"

# lock: skip this run if the previous one is still going
exec 9>"$STATE_DIR/lock"
flock -n 9 || { echo "$(date -u +%FT%TZ) previous run still active, skipping"; exit 0; }

notify() {  # token goes to curl on stdin, not in the process list
  printf 'url = "%s/bot%s/sendMessage"\n' "$API" "$TELEGRAM_BOT_TOKEN" |
    curl -fsS --max-time 20 -K - \
      --data-urlencode "chat_id=$TELEGRAM_CHAT_ID" \
      --data-urlencode "text=$1" >/dev/null
}

NEW="$STATE_DIR/new.xml"; BASE="$STATE_DIR/baseline.xml"; DIFF="$STATE_DIR/last.diff"

# full TCP scan, open ports only, default timing
nmap -Pn -p- --open -T3 -oX "$NEW" "$TARGET" >/dev/null

if [ ! -f "$BASE" ]; then
  mv "$NEW" "$BASE"; rm -f "$STATE_DIR/alerted"
  echo "$(date -u +%FT%TZ) baseline saved for $TARGET"
  exit 0
fi

rc=0
ndiff "$BASE" "$NEW" > "$DIFF" || rc=$?
case "$rc" in
  0) echo "$(date -u +%FT%TZ) no change on $TARGET"; rm -f "$STATE_DIR/alerted" ;;
  1) # alert once per distinct change (header lines differ every run, so ignore them)
     sig=$(grep -E '^[-+]' "$DIFF" | grep -vE '^[-+]Nmap ' | sha256sum | cut -d' ' -f1)
     if [ "$sig" != "$(cat "$STATE_DIR/alerted" 2>/dev/null || true)" ]; then
       notify "Port change on $TARGET:
$(grep -vE '^[-+]Nmap ' "$DIFF" | head -c 3500)"
       echo "$sig" > "$STATE_DIR/alerted"
       echo "$(date -u +%FT%TZ) CHANGE on $TARGET, alert sent"
     else
       echo "$(date -u +%FT%TZ) same change as last alert, not repeating"
     fi ;;
  *) notify "portwatch error: ndiff exited with $rc for $TARGET"; exit 1 ;;
esac
sudo install -m 755 portwatch.sh /usr/local/bin/portwatch.sh
17 3 * * * /usr/local/bin/portwatch.sh >> /var/log/portwatch.log 2>&1What the script does:
set -euo pipefailstops on errors and unset variables, andumask 077keeps every file it creates private to root.- The lock is
flock -non an open file descriptor. Per the flock manual,-nfails instead of waiting, so a run started while another is still scanning exits quietly. - The first run only saves
baseline.xml. Later runs message you only when ndiff exits 1, and only once per distinct change. - The Telegram call is a POST to
/bot<token>/sendMessagewithchat_idandtext. The sendMessage docs limit the text to 4096 characters, so the script cuts the diff at 3500. Passing the URL throughcurl -K -keeps the token out of the process list. - If the scan itself fails,
set -eends the run and cron writes the error to the log. To accept a deliberate change, runsudo rm /var/lib/portwatch/baseline.xmland run the script once.
Want to know what the internet sees on your server?
A free, read-only check shows which ports and services answer from outside and what to close first.
Get your free server check Talk to a security engineerWe ran it in Docker: real output
We tested this on 9 November 2026 with two Ubuntu 24.04 containers on a private Docker network that uses the documentation range 203.0.113.0/24: a target at 203.0.113.10 running sshd, nginx and ufw (default deny, allow 22 and 80), and a scanner at 203.0.113.20 with nmap 7.94SVN. Both images are our own: ubuntu:24.04 plus those packages. We did not send a real Telegram message. The script's TELEGRAM_API variable pointed at a small local stand-in server that prints what it receives, so we know the request is well formed, not that Telegram accepts it.
docker network create --subnet 203.0.113.0/24 scan-lab
docker run -d --name lab-target --network scan-lab --ip 203.0.113.10 --cap-add NET_ADMIN scan-target
docker run -d --name lab-scanner --network scan-lab --ip 203.0.113.20 scan-scanner sleep infinity
Step 1: baseline and no change. With ufw allowing only 22 and 80, the first run saved the baseline and the next run found nothing new. A full 65535-port scan took about 1 minute 46 seconds here and will be slower across the internet.
Step 2: the wrong picture. We then started a third service on the target with python3 -m http.server 8080, still behind ufw. Trimmed output:
# on the target, scanning its own address
22/tcp   open  ssh
80/tcp   open  http
8080/tcp open  http-proxy

# from the scanner container
22/tcp   open     ssh
80/tcp   open     http
8080/tcp filtered http-proxy
Step 3: the new port. We ran ufw allow 8080/tcp on the target, which is what a published Docker port or a careless rule looks like from outside. We started the script, and a second copy started a few seconds later was refused by the lock. The first run then logged the change, and running ndiff on the saved files showed the new port (the image below shows the same lines):
2026-11-09T18:52:14Z baseline saved for 203.0.113.10
2026-11-09T18:54:00Z no change on 203.0.113.10
2026-11-09T18:54:28Z previous run still active, skipping
2026-11-09T18:56:13Z CHANGE on 203.0.113.10, alert sent
ndiff baseline.xml new.xml; echo "exit code: $?"
lab-target.scan-lab (203.0.113.10, 2E:43:E7:C8:8D:35):
-Not shown: 65533 filtered ports
+Not shown: 65532 filtered ports
PORT STATE SERVICE VERSION
+8080/tcp open http-proxy
exit code: 1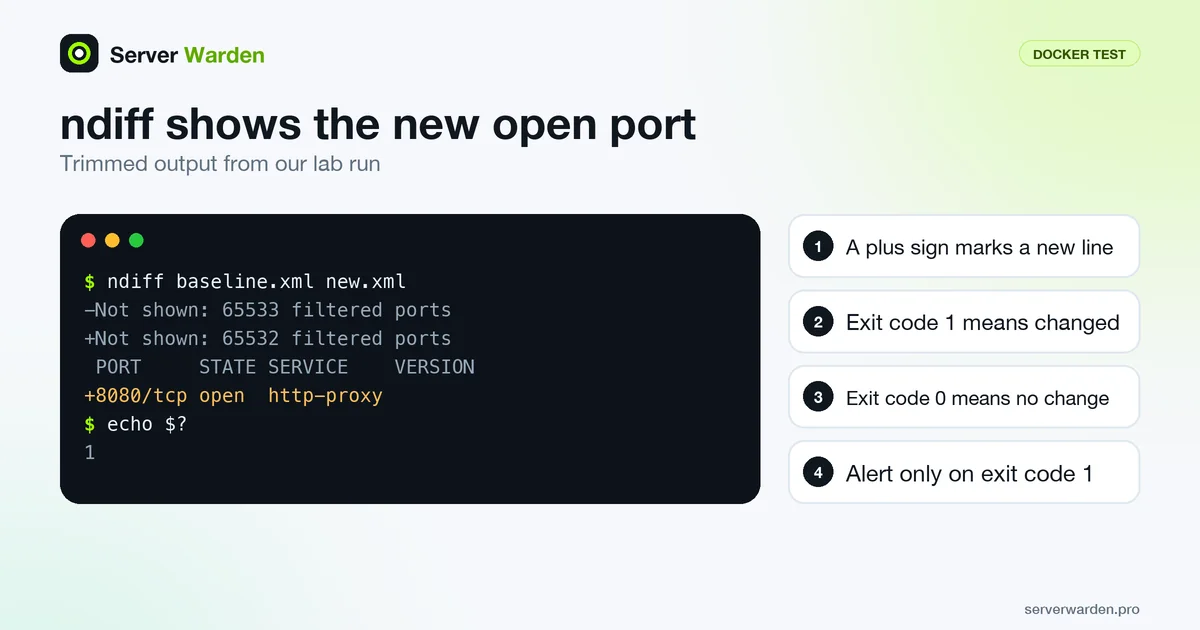
Step 4: repeat and clean up. The stand-in server received a request to /bot123456789:EXAMPLE_NOT_A_REAL_TOKEN/sendMessage with the chat id and the text "Port change on 203.0.113.10" followed by the diff lines. A rerun said same change as last alert, not repeating. After ufw delete allow 8080/tcp the next run said no change.
Compare with the server view: ss and ufw
The outside scan tells you what is reachable; the server tells you why. On the server run the two checks below. In ss(8), -t shows TCP sockets, -u UDP, -l only listening ones, -n numbers instead of names and -p the process. The ufw manual says status verbose gives extra information, and notes that plain status omits rules kept in files under /etc/ufw.
sudo ss -tulnp
sudo ufw status verbose
Reconcile the lists like this:
- Listening, but filtered from outside (port 8080 above): the firewall is doing its job. Still bind the program to 127.0.0.1 if it is not meant to be public, because a firewall is a second lock, not the only one.
- Open from outside, but not allowed in ufw: look for a Docker published port, another firewall rule, or a provider setting. Start with the Docker host security guide and the Docker Compose deployment guide.
- Open on a database or admin port: treat it as urgent and use the table in the next section.
Cloudflare in front. A proxied name hides the origin's web ports only while the origin refuses direct visitors. Scan the origin IP: if 80 and 443 answer anyone on the internet, the origin can be reached around Cloudflare. The sibling guide on locking down the origin explains the fix, and the glossary covers the origin server IP.
What a port scan cannot see: services reachable only over a VPN, pages behind a login, a rule that allows only one source address (you will see it as filtered from the scanner), weak passwords and bugs in your application. Use a vulnerability scanner for web exposure; the comparison of Nuclei, reNgine and Uptime Kuma shows where each tool fits.
What should be open, and what to do when it is not
For a typical web VPS the outside scan should show a very short list. Anything else is a question to answer, not necessarily an emergency.
| Port or service | Expected? | If it shows up |
|---|---|---|
| 22/tcp, SSH (or your custom port) | Yes | Keep, with key login only. See SSH hardening. |
| 80/tcp and 443/tcp, web | Yes, if you host a site | Keep. Review nginx settings. |
| Databases: 3306 MySQL, 5432 PostgreSQL, 27017 MongoDB, 6379 Redis | No | Urgent. Bind to 127.0.0.1 and firewall the port. Read exposed databases. |
| Docker API over TCP (2376 is the documented TLS port) | No | Close it. Read Docker host security and the Docker socket term. |
| Dev servers and admin panels on ports such as 3000, 8000, 8080, 9000 | No | Bind to 127.0.0.1 and put nginx in front. See deploying securely. |
| Any port you do not recognize | Find out | Run sudo ss -tulnp to see the process, then close it or document it. |
The usual fix is a default-deny ufw policy plus binding the service to localhost; the VPS security checklist shows the order. Default ports are from each project's documentation (see the sources below).
Politeness, limits and what to do next
A daily or weekly run of one scan is plenty. Keep it polite:
- One target, default timing or
-T2, a quiet hour. On a small server avoid-T4and-T5, and do not run it every few minutes. For availability use Uptime Kuma; keep the port scan for exposure changes. - Remember it is one check among several. Pair it with web checks from the Nuclei guide, a log review (server monitoring) and updates.
- If a scan finds something you cannot explain, read breach response first, then ask for help early.
How we checked this. On 9 November 2026 we ran every command above in Ubuntu 24.04 containers: nmap 7.94SVN, ndiff from the Ubuntu package, ufw, curl and flock, against our own target container. Docker published-port behaviour, UDP timing, Cloudflare ports and default ports of other products come from their documentation, which we read but did not test. Telegram delivery was not tested.
Sources: Nmap reference guide, Ndiff, Ndiff manual, Nmap legal issues, Telegram sendMessage, Docker packet filtering, Cloudflare network ports, Redis security and redis-cli, PostgreSQL connections, MongoDB default port, MySQL variables, Docker daemon access.
Frequently asked questions
How do I check which ports are open on my VPS from outside?
Run nmap from a second machine against your own server IP, for example sudo nmap -Pn -p- --open YOUR_IP, which lists every open TCP port. Do not run it on the server itself, because that shows a different picture.
Is it OK to run nmap against my own server?
Scanning an IP address you own is normal practice, but check your hosting provider acceptable use policy first, because the Nmap book notes that scanning without authorization is sometimes against a provider policy. Never scan addresses you do not own, and note that this is not legal advice.
Why does nmap show different ports than ss -tulnp?
The ss command lists what programs listen on, while nmap shows what actually answers after the provider firewall, ufw and Docker rules. A port that listens but is filtered is blocked, and a port that is open but not allowed in ufw often comes from a Docker published port.
What do open, closed and filtered mean in nmap?
Open means an application accepts connections on that port, closed means the port is reachable but nothing listens, and filtered means packet filtering stops nmap from telling. A default-deny firewall normally makes unused ports show as filtered.
How do I get a Telegram alert when a new port opens?
Scan on a schedule, save the first XML result as a baseline and compare each run with ndiff, which exits with code 1 when the scans differ. When it does, send the diff with curl to the Bot API sendMessage method using your bot token and chat id.
Does nmap -sU find UDP ports reliably?
No. UDP scans are slow because many hosts rate limit ICMP replies, and ports that stay silent are reported as open|filtered. Scan only the few UDP ports you care about and treat the result as a hint, not proof.
Should I scan my domain or my server IP when I use Cloudflare?
Scan the server IP. A proxied domain name leads to Cloudflare, which proxies only certain HTTP and HTTPS ports and is not your server. Scanning the origin IP also shows whether the origin answers visitors directly.
Not sure where your server stands?
Get a free, read-only security check, or talk to a security engineer about managed protection.
Get your free server check Talk to a security engineer