Published 2026-11-09 · Updated 2026-11-09
Is Your Origin IP Exposed Behind Cloudflare? Test and Fix
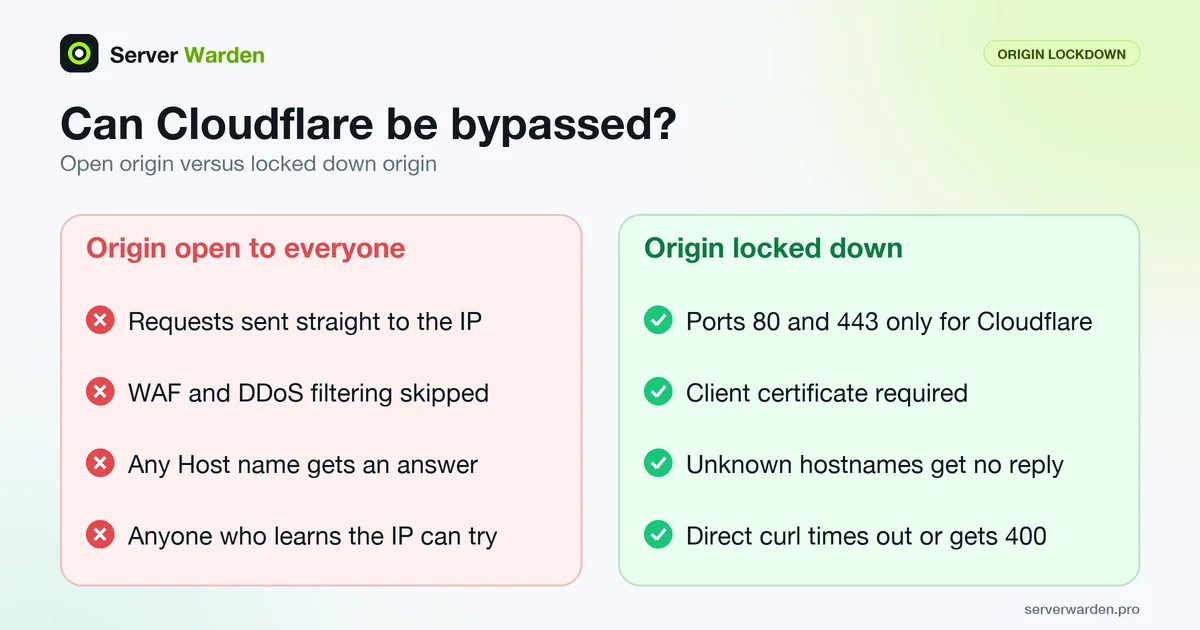
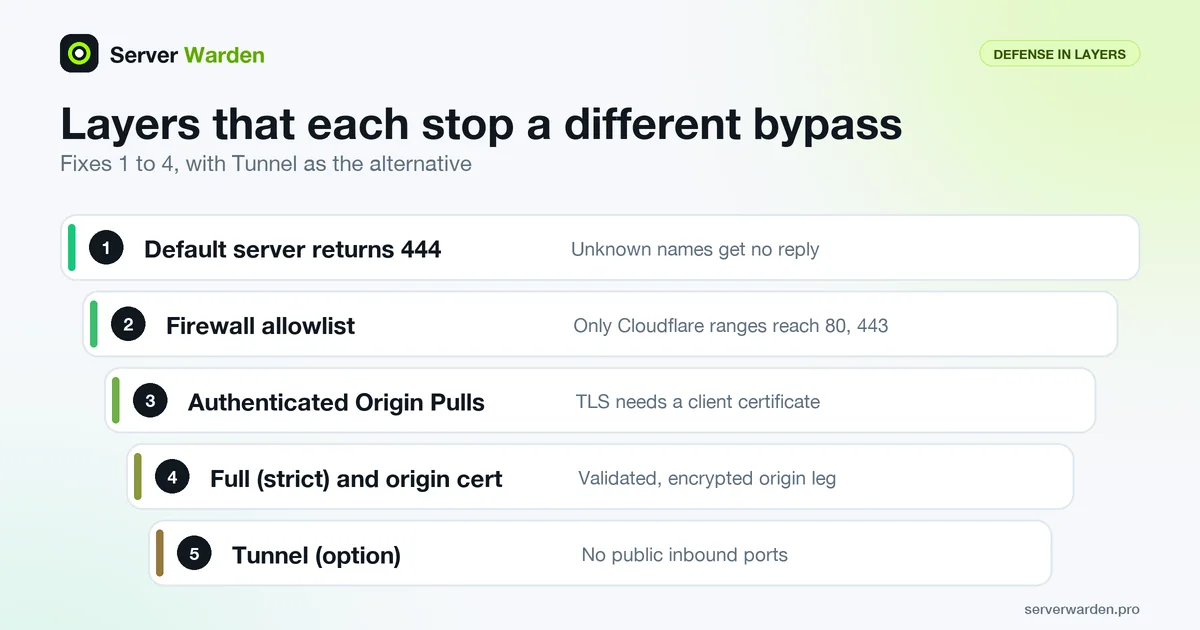
Short answer: Cloudflare only protects traffic that passes through it. To test your own setup, request your server's public IP address directly with curl and your domain in the Host header. If your site answers, anyone who learns that IP bypasses Cloudflare's firewall and DDoS filtering. Fix it by allowing ports 80 and 443 only from Cloudflare's published IP ranges, requiring Authenticated Origin Pulls, and rejecting unknown hostnames.
Only scan what you own. Every test here targets your own domains and your own server, and the lab behind this guide used containers we started ourselves. This guide is part of the self-hosted external security monitoring series. The origin server IP is the public address of the real server behind Cloudflare.
In this article
Why a visible origin IP defeats Cloudflare How an origin IP leaks: what to check in your own setup Self-test: ask your own server directly Fix 1: a default server that rejects other hostnames Fix 2: allow only Cloudflare to reach ports 80 and 443 Fix 3: Authenticated Origin Pulls in nginx Fix 4: Full (strict) and a certificate, or Cloudflare Tunnel Keep it locked and recover after a leak Leak paths at a glance, and what to do next Frequently asked questionsQuick win (25 minutes)
- List your DNS records and find every
A,AAAAorCNAMErecord that is DNS only (grey cloud). See the leak list. - From a different machine, run
curl -sSk -m 8 -o /dev/null -w '%{http_code}\n' --resolve example.com:443:203.0.113.10 https://example.com/. A200means the origin answers directly. - Add a default nginx server with
return 444;so requests for unknown hostnames get no answer (Fix 1). - Allow TCP 80 and 443 only from Cloudflare's ranges (Fix 2) and keep your SSH rule untouched.
- Put the direct-IP test into cron on another host, so a future mistake alerts you (monitoring).
Why a visible origin IP defeats Cloudflare
Cloudflare works as a reverse proxy: visitors talk to Cloudflare, and Cloudflare talks to your real server, the origin server. The protection (WAF rules, rate limits, DDoS filtering) runs in Cloudflare's network. The proxy status documentation says a proxied (orange cloud) record is answered with Cloudflare addresses, while a DNS only (grey cloud) record is answered with your server's real IP.
If your server also accepts connections from anyone who types its IP into curl, a request sent straight to it never meets those rules. That is why the Authenticated Origin Pulls overview states that without extra protection anyone who finds the origin IP can bypass Cloudflare. For the DDoS side of this, see DDoS protection for a small business.
Hiding the IP is a weak control on its own. Cloudflare's protect your origin server page notes that DNS history can hold addresses from before a domain joined Cloudflare and recommends rotating origin IPs. Public scanning databases also index the open internet (our general note), so a server that answers everyone on 443 can be found without your domain. Plan for the IP becoming known and make the server refuse everyone but Cloudflare. That also shrinks your attack surface.
How an origin IP leaks: what to check in your own setup
These are questions about your own configuration. Each is a way the address of your server can become visible.
- DNS only (grey cloud) records. Per the proxy status docs, only A, AAAA and CNAME records can be proxied, and a DNS only record exposes the origin IP to anyone who queries it. Typical culprits are
mail,ftp,direct,origin,staginganddevnames. The protect-your-origin page also warns that TXT records such as SPF can contain the server's IP. - Mail sent from the same server. The same page says bounced emails to nonexistent addresses reveal the mail server IP. Send mail through a separate provider.
- DNS history from before Cloudflare. Old records stay in public history services. The remedy is a new origin IP (see the recovery steps below).
- Certificates and forgotten hostnames. Certificate Transparency logs are, as RFC 9162 describes them, append-only logs of issued certificates that anyone can monitor. Every hostname you ever requested a certificate for can be listed, which is how subdomain enumeration finds a forgotten grey-cloud
stagingname. A server that answers on its IP with the same certificate or the same site also identifies itself. - Outbound requests from the origin. Webhooks, link previews, image fetchers and update checks come from the server, and the receiver sees the source address (a general networking fact).
- The same IP serving unrelated sites. Another domain that is not proxied and points at the same IP reveals it. See how to isolate projects on one VPS.
Self-test: ask your own server directly
Run these from a machine that is not the origin and not on any allowlist, such as your laptop or a second server. On the origin itself they always work and prove nothing.
Step 1: list DNS records that are not proxied. In your DNS dashboard, check every record of every domain you own. With the API, the export endpoint tags records cf-proxied:true or cf-proxied:false (we did not test this against a real account):
curl -sS -H "Authorization: Bearer YOUR_API_TOKEN" \
  "https://api.cloudflare.com/client/v4/zones/YOUR_ZONE_ID/dns_records/export" | grep 'cf-proxied:false'
A read-only token with DNS Read is enough, per the docs. Also look for A records of your other domains that point at the same IP.
Step 2: request the origin directly. -k skips certificate checks because the certificate is not issued for a bare IP, and --resolve makes curl use the address you give for a host and port pair:
curl -sSk -m 8 -i http://203.0.113.10/
curl -sSk -m 8 -i https://203.0.113.10/
curl -sSk -m 8 -o /dev/null -w '%{http_code}\n' --resolve example.com:443:203.0.113.10 https://example.com/
We ran this against a local nginx on Ubuntu 24.04 that serves one site (the lab address is replaced by 203.0.113.10). First an origin that answers everyone, then the same origin with a default server that returns 444 and rejects unknown TLS names (Fix 1).
# origin that answers everyone
curl -sS http://203.0.113.10/
hello from example.com origin

# with Fix 1 in place
curl -sS http://203.0.113.10/
curl: (52) Empty reply from server
curl -sSk https://203.0.113.10/
curl: (35) OpenSSL/3.0.13: error:0A000458:SSL routines::tlsv1 unrecognized name
Read the result like this: 200, 301 or 404 means your server answers around Cloudflare. 000 (no HTTP response), 400 or 403 means it does not serve content.
Step 3: check the default virtual host. A server that shows your certificate to a request that names no site hands out your hostname:
openssl s_client -connect 203.0.113.10:443 </dev/null 2>/dev/null | openssl x509 -noout -subject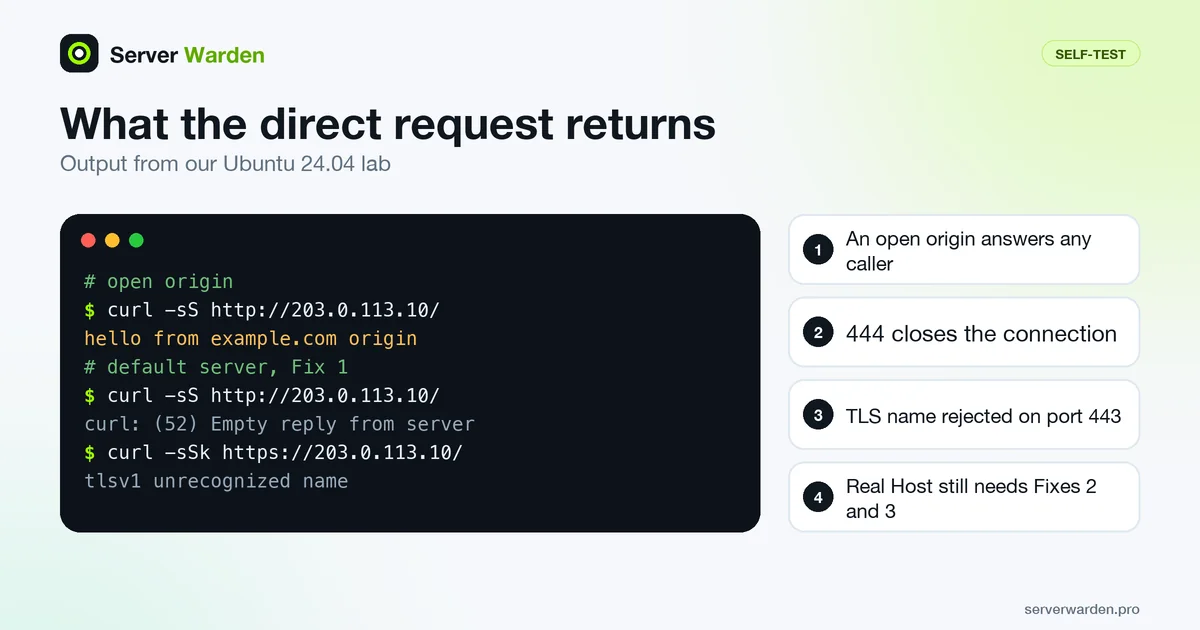
On the open lab origin this printed subject=CN = example.com. With Fix 1 the handshake failed and OpenSSL reported no peer certificate available.
Fix 1: a default server that rejects other hostnames
nginx picks a server block by the listen port and then the Host header. The request processing docs say that when no server_name matches, the request goes to the default server of that port, and that return 444 closes the connection without a reply. ssl_reject_handshake (nginx 1.19.4 or newer) refuses the TLS handshake in a block. Add catch-all servers for both ports (nginx hardening: nginx security best practices):
# /etc/nginx/conf.d/00-default.conf
server {
    listen 80 default_server;
    listen [::]:80 default_server;
    return 444;
}
server {
    listen 443 ssl default_server;
    listen [::]:443 ssl default_server;
    ssl_reject_handshake on;
}
Your real sites keep an explicit server_name example.com;. Then run sudo nginx -t && sudo systemctl reload nginx. If nginx -t prints a duplicate default server, another file such as the stock sites-enabled/default already claims that port; we saw this error when we added two defaults.
Limit: this stops scanners and requests for unknown names, but not someone who sends your real hostname. In our test, curl with --resolve example.com:443:IP still got the site (HTTP 200), and so did -H "Host: example.com" over port 80. Fixes 2 and 3 close that gap.
Fix 2: allow only Cloudflare to reach ports 80 and 443
Cloudflare's IP address documentation recommends allowing its ranges at the origin and blocking other traffic. The official lists are on cloudflare.com/ips and as plain text at https://www.cloudflare.com/ips-v4 and https://www.cloudflare.com/ips-v6. We do not paste the ranges: fetch them yourself. The docs say the ranges change rarely and new ones are published before use, so a weekly refresh is enough.
Warning: do not lock yourself out. This design touches only TCP 80 and 443, never SSH, but keep a second SSH session open during any firewall change. Decide who else needs the web ports: your admin IP, an uptime monitor, and the scanner from the port scan guide (it will now see them as filtered, which is the goal).
nftables version. A separate nftables table drops web traffic from every other source. Placeholders use documentation ranges; save it as /etc/nftables.d/origin-guard.nft:
# /etc/nftables.d/origin-guard.nft
table inet origin_guard
delete table inet origin_guard

table inet origin_guard {
    set cf4 { type ipv4_addr; flags interval; elements = { 203.0.113.0/24 } }
    set cf6 { type ipv6_addr; flags interval; elements = { 2001:db8:1::/48 } }
    set trusted4 { type ipv4_addr; flags interval; elements = { 198.51.100.7 } }
    chain input {
        type filter hook input priority -10; policy accept;
        iifname "lo" accept
        tcp dport { 80, 443 } ip saddr @cf4 accept
        tcp dport { 80, 443 } ip6 saddr @cf6 accept
        tcp dport { 80, 443 } ip saddr @trusted4 accept
        tcp dport { 80, 443 } counter drop
    }
}
Check without applying (nft -c), then apply (nft -f):
sudo nft -c -f /etc/nftables.d/origin-guard.nft && sudo nft -f /etc/nftables.d/origin-guard.nftIn our two-container lab (nftables 1.0.9), a client outside the sets timed out on ports 80 and 443 (curl exit 28) while a closed port still refused at once, and adding the client's address to a set made it work again. A typo such as flags intervall made nft -c fail with a syntax error and exit code 1.
Refresh script. It replaces the two Cloudflare sets from the official lists, validates the update first, and keeps the old rules if a download is empty or garbage (tested with local mock lists, never against Cloudflare):
#!/bin/sh
# /usr/local/sbin/update-cloudflare-nft.sh  (run as root)
set -eu
V4_URL="${V4_URL:-https://www.cloudflare.com/ips-v4}"
V6_URL="${V6_URL:-https://www.cloudflare.com/ips-v6}"
WORK=$(mktemp -d); trap 'rm -rf "$WORK"' EXIT
V4=$(curl -fsS --max-time 20 "$V4_URL" | grep -E '^[0-9]{1,3}(\.[0-9]{1,3}){3}/[0-9]{1,2}$' | paste -sd, -)
V6=$(curl -fsS --max-time 20 "$V6_URL" | grep -E '^[0-9a-fA-F:]+/[0-9]{1,3}$' | paste -sd, -)
[ -n "$V4" ] && [ -n "$V6" ] || { echo "empty list, keeping current rules" >&2; exit 1; }
cat > "$WORK/update.nft" <<NFT
flush set inet origin_guard cf4
add element inet origin_guard cf4 { $V4 }
flush set inet origin_guard cf6
add element inet origin_guard cf6 { $V6 }
NFT
nft -c -f "$WORK/update.nft"      # syntax check, changes nothing
nft -f "$WORK/update.nft"         # one atomic update
{ echo "table inet origin_guard"; echo "delete table inet origin_guard"; nft list table inet origin_guard; } \
  > /etc/nftables.d/origin-guard.nft    # saved copy for boot
Make it executable, run it once, and schedule it with this /etc/cron.d file (weekly refresh, saved rules reloaded at boot). We simulated a reboot by deleting the table and loading the saved file, but did not reboot a real machine:
17 4 * * 1 root /usr/local/sbin/update-cloudflare-nft.sh 2>&1 | logger -t cf-nft
@reboot root /usr/sbin/nft -f /etc/nftables.d/origin-guard.nft
ufw version. With ufw, add one rule per listed range, then delete the broad web rules. --dry-run checks syntax; for our placeholder it printed ### tuple ### allow tcp 80,443 0.0.0.0/0 any 203.0.113.0/24 in:
sudo ufw --dry-run allow from 203.0.113.0/24 to any port 80,443 proto tcp
sudo ufw allow from 203.0.113.0/24 to any port 80,443 proto tcp comment cloudflare
sudo ufw status numbered
sudo ufw delete allow 443/tcp
Repeat the allow line for every IPv4 and IPv6 range and remove old rules such as Nginx Full with ufw delete allow 'Nginx Full'. Never run ufw reset over SSH.
Exceptions and limits. Let's Encrypt HTTP-01 validation works only on port 80, so an allowlist can break renewals; DNS-01 needs no inbound port (renewal guide). If nginx runs in Docker with published ports, Docker's packet filtering docs say published ports bypass host firewall rules, so this input rule would not apply (not tested here). Finally, an allowlist proves only that a request came from a Cloudflare address, and Cloudflare rates it moderately secure. That is why Fix 3 exists.
Fix 3: Authenticated Origin Pulls in nginx
Authenticated Origin Pulls (AOP) is mutual TLS: your server demands a client certificate and Cloudflare presents one. The overview describes three kinds: global uses a Cloudflare certificate shared by all accounts and only proves a request came from the Cloudflare network; zone-level uses a certificate you upload for your whole zone; per-hostname does the same for chosen hostnames. Only your own certificate proves the request came from your account. AOP needs SSL mode Full or Full (strict), is not compatible with Cloudflare Tunnel, and is available on all plans.
For the global kind, the setup page gives the Cloudflare CA file at https://developers.cloudflare.com/ssl/static/authenticated_origin_pull_ca.pem and saves it as /etc/nginx/certs/cloudflare.crt. For zone-level, you create your own CA and a leaf certificate (the zone-level page requires basicConstraints=CA:FALSE and refuses a root CA upload). We used this to build a test pair:
openssl req -x509 -newkey rsa:2048 -nodes -days 365 -keyout ca.key -out ca.pem -subj "/CN=My Origin Pull CA"
openssl req -newkey rsa:2048 -nodes -keyout client.key -out client.csr -subj "/CN=my-zone-origin-pull"
printf 'basicConstraints=CA:FALSE\n' > leaf.ext
openssl x509 -req -in client.csr -CA ca.pem -CAkey ca.key -CAcreateserial -out client.crt -days 365 -extfile leaf.ext
Keep ca.key off the server. Uploading client.crt and its key to Cloudflare and switching AOP on is done in the dashboard or API as the docs describe; we did not test those Cloudflare steps. The nginx side, rolled out in the two stages the docs recommend:
server {
    listen 443 ssl;
    server_name example.com;
    ssl_certificate     /etc/nginx/certs/example.crt;
    ssl_certificate_key /etc/nginx/certs/example.key;
    ssl_client_certificate /etc/nginx/certs/origin-pull-ca.pem;
    ssl_verify_client optional;      # stage 1, then change to: on
    add_header X-Client-Verify $ssl_client_verify always;   # remove after testing
}
The nginx docs define ssl_client_certificate as the trusted CA file, optional as verify-if-present, and $ssl_client_verify as SUCCESS, FAILED:reason or NONE. In our lab, nginx -t passed, and the results matched:
optional, no certificate    -> HTTP 200, X-Client-Verify: NONE
optional, our client cert   -> HTTP 200, X-Client-Verify: SUCCESS
on, no certificate          -> HTTP 400  No required SSL certificate was sent
on, our client cert         -> HTTP 200
on, self-signed other cert  -> HTTP 400
Switch to on only after real Cloudflare traffic shows SUCCESS, otherwise you block your own visitors. AOP covers TLS only: in the lab, port 80 with the right Host header still answered 301, so close or filter port 80 too. Cloudflare can alert before an uploaded certificate expires (30 and 14 days, per the docs). Wider TLS background: TLS and SSL.
Fix 4: Full (strict) and a certificate, or Cloudflare Tunnel
SSL mode. The SSL/TLS modes page lists Off, Flexible (HTTP to your origin), Full (HTTPS, certificate not validated) and Full (strict) (HTTPS, certificate validated), and strongly recommends Full or Full (strict). Per the Full (strict) page, the origin certificate must be unexpired, match the hostname and come from a public CA such as Let's Encrypt or from Cloudflare Origin CA, and port 443 must be open. Flexible keeps your origin on plain HTTP, which blocks both AOP and closing port 80.
A Cloudflare Origin CA certificate encrypts only the Cloudflare to origin leg and works with Full (strict). Visitors see certificate errors if you pause Cloudflare or make the name DNS only, and Cloudflare sends no expiry notices for it, so note the date. Changing the mode is a dashboard step we did not test.
Cloudflare Tunnel (not tested by us). Per the Tunnel docs, the cloudflared daemon on your server makes outbound-only connections to Cloudflare, so you need no publicly routable IP, and you can block all inbound traffic in the firewall. The create-a-tunnel steps are: create the tunnel, run the install command the dashboard shows on your server, then add a published application with a service URL such as http://localhost:8000. AOP has no effect on tunneled hostnames, because nothing listens for a client certificate. Trade-off: a stopped cloudflared takes the site down, and the old IP stays in DNS history, so close its web ports anyway.
Not sure what your server shows to the internet?
A free, read-only check shows which ports and addresses answer from outside and what to fix first.
Get your free server check Talk to a security engineerKeep it locked and recover after a leak
Lockdowns rot: a new subdomain, a restored backup or a firewall reset undoes them. Repeat the direct-IP test on a schedule, from a host outside your allowlist. This script prints one line per name and port and exits 1 on a leak:
#!/bin/sh
# /usr/local/bin/origin-direct-check.sh
ORIGIN_IP="${ORIGIN_IP:-203.0.113.10}"
HOSTS="${HOSTS:-example.com www.example.com}"
FAIL=0
for h in $HOSTS; do
  for p in 80 443; do
    scheme=http; [ "$p" = 443 ] && scheme=https
    code=$(curl -sk -o /dev/null -m 8 -w '%{http_code}' --resolve "$h:$p:$ORIGIN_IP" "$scheme://$h/" || true)
    case "$code" in
      000|400|403) echo "ok     $scheme://$h -> $code" ;;
      *)           echo "LEAK   $scheme://$h -> $code"; FAIL=1 ;;
    esac
  done
done
exit "$FAIL"
We ran it every minute from /etc/cron.d in the lab. It reported LEAK ... 200 on the open origin, LEAK http ... 301 plus ok https ... 400 with AOP but no firewall, and 000 for both ports once the nftables allowlist was loaded. Send the exit code to chat with Uptime Kuma and Telegram, and run the scheduled port scan and Nuclei scans against your own hosts as well. Also keep a normal uptime check on the public site, because a wrong allowlist takes the real site down.
After a leak. Treat the old address as permanently known, because attackers keep it. Lock down first, then change: ask your provider for a new IP or rebuild the server on one, apply Fixes 1 to 3 on the new IP before pointing DNS at it, then update records and release the old address. Remove grey-cloud names that should not exist, and move mail off the web server. If you saw actual abuse, follow the breach response guide.
Leak paths at a glance, and what to do next
| Leak path | Check it yourself | Fix |
|---|---|---|
| DNS only record | Export DNS, find cf-proxied:false | Proxy it, or move it off this IP |
| Mail from this server | Look at your own mail headers and bounces | Use a separate mail provider |
| Old DNS history | Ask: was this IP ever in public DNS? | New origin IP, then lockdown |
| Certificates and names | Search Certificate Transparency for your domain | Delete forgotten names, Fix 1 |
| Outbound requests | List webhooks, previews, fetchers | Send through a relay |
| Open IP and port | Direct curl test (Step 2) | Fixes 1, 2 and 3 |
What to do next. Apply Fix 1 today, the allowlist this week, AOP after that, then schedule the test. Ask for help when you cannot tell which names are yours, when a firewall change risks your only SSH access, or when you suspect someone already used the origin IP.
How we checked this. On 9 November 2026 we ran every nginx, openssl, curl, nftables and ufw command in two Ubuntu 24.04 containers (nginx 1.24.0, nftables 1.0.9, ufw 0.36.2, curl 8.5.0, OpenSSL 3.0.13) on a private Docker network, and copied the outputs above. Not tested by us: anything in a real Cloudflare account (DNS export, AOP upload, SSL mode, Tunnel), Docker published ports, reboot persistence, and the live Cloudflare lists.
Sources:
Frequently asked questions
How do I check if my origin IP is exposed behind Cloudflare?
From a machine other than your server, run curl with --resolve example.com:443:YOUR_ORIGIN_IP https://example.com/ and look at the status code. A 200, 301 or 404 means the origin answers around Cloudflare; no response, 400 or 403 means it does not serve content.
Does the orange cloud in Cloudflare hide my server IP?
Only for the proxied record itself. Cloudflare says DNS only (grey cloud) records return your real IP, and mail, old DNS history and outbound requests from the server can also reveal it, so lock the origin down as well.
Should I allow only Cloudflare IP ranges in my firewall, and how often should I update them?
Yes, allow TCP 80 and 443 only from the official ranges and keep SSH and your own admin IPs separate. Cloudflare says the ranges change rarely and new ones are published before use, so refresh them from the official lists weekly and validate the file before loading it.
What is Authenticated Origin Pulls and do I need it?
It is mutual TLS: nginx requires a client certificate that Cloudflare presents, so direct requests get an error. It is stronger than an IP allowlist, especially with your own zone-level certificate, but it needs SSL mode Full or Full (strict) and does not cover port 80.
Does Cloudflare Tunnel hide my origin IP?
A tunnel uses outbound-only connections, so the server needs no public inbound ports and you can block all inbound traffic. Authenticated Origin Pulls has no effect on tunneled hostnames, and an old IP from DNS history stays known.
My origin IP leaked. Do I have to change it?
Usually yes, because attackers keep old addresses and Cloudflare advises rotating origin IPs. Ask your provider for a new one, lock it down before pointing DNS at it, then release the old address.
Why does curl to my server IP say "Empty reply from server" or "tlsv1 unrecognized name"?
Those are the expected results of a default server with return 444 and ssl_reject_handshake on: it refuses requests that do not name your site. It means the lockdown works; test with your real Host name to check the other layers.
Not sure where your server stands?
Get a free, read-only security check, or talk to a security engineer about managed protection.
Get your free server check Talk to a security engineer